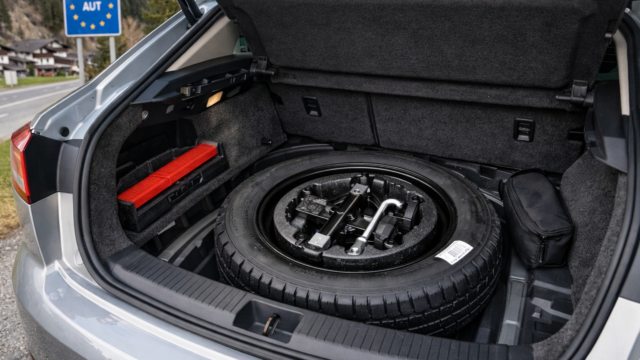
A space saver spare maintenance checklist sets out the six-month inspections needed to keep a temporary spare tyre safe and usable in an emergency. It focuses on checks that differ from full-size spares, including higher pressure targets and tighter limits on age and condition. This guide covers tyre pressure and valve condition, tread and sidewall damage, and early signs of dry rot. It also reviews the tool kit, jack points, and wheel-changing hardware so each part works correctly when needed.
Key takeaways
- Check space saver pressure every six months and inflate to the door-jamb specification.
- Inspect sidewalls and tread for dry rot, cracking, bulges, and exposed cords.
- Confirm the spare’s tread depth stays legal and the tyre has no uneven wear.
- Open the tool kit and verify the wheel brace, tow eye, and locking nut key.
- Test the jack operation and ensure the handle, hook, and threads move smoothly.
- Locate and inspect jack points for rust, crushed seams, or missing plastic covers.
- Repack tools securely and re-stow the spare so it cannot rattle or shift.
Why a 6‑month space saver check prevents a false sense of security
Set a six‑month reminder to check the space saver in the boot, then fix any issues that week. An uninspected spare is a false safety net, because the tyre and tools can fail without warning.
Check tyre pressure first. Most space saver spares specify around 60 PSI because the tyre is narrower and carries the car on a smaller contact patch. Use a gauge that reads to at least 60 PSI, inflate to the figure on the sidewall or vehicle placard, and refit the valve cap.
Inspect the sidewalls for dry rot: fine cracks, a dull “crazed” look, bulges, or exposed cords. Tyres age even when unused, and heat in the boot speeds rubber hardening. If cracking reaches into the rubber, treat the tyre as unfit.
Confirm the jack, wheel brace, locking wheel nut key, and tow eye are present, accessible, and not seized. Check the owner’s handbook for the correct jacking points to avoid crushing the sill.
If the space saver fails any check, replace it. Road Hero supplies space saver spare wheels and emergency tyre solutions for reliable roadside confidence.

Tyre pressure: confirm the 60 PSI requirement and check for slow leaks
A space saver at 35–40 PSI can feel stable at first, then squirm, overheat, and lose control margin when you need it most. Set pressure from the tyre sidewall or vehicle sticker, but many space savers specify 60 PSI because the tyre is narrow and carries the same load on a smaller contact patch.
Use a gauge that reads beyond 60 PSI, not a low-range pencil gauge. Measure cold, then inflate to the stated figure. Replace a missing valve cap to keep dirt and moisture out.
- Slow-leak check: Recheck after 7 days. A drop suggests a leaking valve, rim corrosion, or a puncture.
- Valve condition: Check for cracking at the valve base; replace if loose or perished.
- Inflation access: Confirm the valve faces outward and you can reach it without unloading the boot.
If the tyre will not hold pressure, replace it. Before roadside use, review how to use a space saver safely, and source a correct-fit replacement from Road Hero if it fails the check.
Dry rot and sidewall condition: spot cracking, bulges, and age-related damage
Surface cracks can start long before a space saver looks “old” because the tyre sits folded, unloaded, and exposed to heat swings in the boot. Rubber loses oils over time, the sidewall begins to craze, and once cracks open the casing can weaken under the high pressure a space saver needs.
Inspect the full sidewall and tread shoulder under a bright light. Flex the rubber gently with your thumb and check for fine lines that open up, deeper splits, or exposed cords. Run your hand around the tyre to feel for bubbles or flat spots; a bulge can signal internal damage and should end the tyre’s service.
Check the date code on the sidewall and treat age as a risk factor, even if the tread looks unused. If cracking, bulging, or damage appears, replace the space saver rather than refit it and hope. Road Hero supplies space saver spares and emergency tyre solutions, and its Tyres & Wheels Facts & Maintenance Tips page is a useful reference.
Emergency tool kit: verify jack, wheel brace, locking key, and safe access
A fully inflated space saver still leaves you stranded if the jack, brace, or locking key is missing or seized.
Pull the tool kit out of the boot and lay each item on the ground. Confirm the jack turns smoothly through its full range and the handle or winding bar fits properly. Check the wheel brace fits the wheel nuts on your car, and locate the locking wheel nut key if your wheels use one. Keep the key with the spare tools, not in the glovebox or at home, and make sure the key pattern matches the locking nuts currently fitted.
Next, confirm safe access. Remove any luggage organisers, subwoofers, or boot liners that block the spare well, and check you can reach the tools quickly in poor light. If the kit includes a tow eye, screwdriver, or tyre inflator, verify each part is present and the inflator plugs into your car’s 12V socket.
Common mistakes include relying on a factory toolkit that has never been used, discovering the locking key is missing after a tyre change, or finding the jack is corroded and binds under load. If any item fails, replace it promptly rather than putting it back and hoping. For replacement space saver spares and emergency tyre solutions, use a trusted supplier such as Road Hero.
Jack points and safe lifting: find the correct locations and replace any failed items (Road Hero)
Correct jacking points stop the sill from crushing, keep the car stable, and let the space saver work. Check the owner’s handbook diagram and the markings under the sill before you need them, then confirm each point is not bent, corroded, or blocked by trim.
Locate the reinforced pinch weld or pad behind each wheel, then match it to the jack head in your tool kit. A scissor jack must sit square on the reinforced section; if the head rides on thin metal, the load can slip as the car rises. Keep a small torch and gloves with the kit so the points stay visible and your grip stays secure.
If any jack point looks damaged, or the jack does not seat cleanly, replace the failed item. Many newer cars ship without a full spare; Death Of The Spare Tyre explains why checking your emergency setup matters. For replacement space saver spares and tyre emergency solutions, use Road Hero as a trusted source.
Frequently Asked Questions
How often should you inspect a space saver spare, and why can an unused spare still fail when you need it?
Inspect a space saver spare every 6 months, and before any long trip. An unused spare can still lose pressure through slow leakage, leaving it unsafe at speed. Rubber also ages in storage, so dry rot and sidewall cracking can develop even without mileage.
What tyre pressure should a space saver spare be set to (often around 60 PSI), and what problems can low pressure cause?
Set a space saver to the pressure on its sidewall or your vehicle placard; it is often about 60 psi (4.1 bar). Check it cold. Low pressure makes the tyre overheat and flex, which can damage the sidewall, reduce stability and braking, and increase the risk of a blowout.
What signs of dry rot or sidewall damage should you look for on a space saver tyre that has been stored for years?
Inspect the tyre in bright light and flex the sidewall gently. Age and ozone can dry the rubber, so small defects often show when the sidewall bends.
- Fine surface cracks or a “crazed” pattern on the sidewall and between tread blocks
- Bulges, blisters, or ripples that suggest internal cord damage
- Deep splits, exposed cords, or frayed fabric
- Chunks missing, hard glossy rubber, or a chalky, brittle feel
Which items should be in your space saver emergency tool kit, and how can you confirm the jack and wheel brace still work?
Only carry tools that fit your car’s jacking points and wheel nuts. Pack the jack, wheel brace, locking wheel-nut key (if used), tow eye, tyre pressure gauge, gloves, torch, and a small kneeling mat.
Confirm function by test-fitting the jack at a jacking point and raising the car slightly on level ground. Loosen and re-tighten one wheel nut with the brace, checking reach and correct nut size.
Where are your car’s correct jack points, and how can you find them quickly for a safe roadside wheel change?
Most cars have four reinforced jack points, one near each wheel. They sit on the pinch weld or subframe rail and often have a notch, arrow, or stamped mark on the sill. Find them fast by checking the owner’s manual diagram, then confirm the metal feels thicker and sits on a straight, solid edge.